安装并配置 TPClash Link to heading
本来是想用 Clash.Meta 作透明代理的,奈何第一步就不知道为啥卡住了:Clash.Meta 运行指定的配置文件之后,无法科学,webui 也无法连接。
后面发现了 tpclash,它可以自动安装 Clash Premium/Meta, 并自动配置基于 Tun 的透明代理。这里为了方便起见,后续操作都是在 root 用户下执行的。
执行 cd && wget https://github.com/mritd/tpclash/releases/download/v0.1.17/tpclash-meta-linux-arm64,然后执行 chmod 755 tpclash-meta-linux-arm64 && mv tpclash-meta-linux-arm64 /usr/local/bin/tpclash。
这样就相当于安装了 tpclash,然后执行 tpclash -c /etc/clash.yaml,其中 /etc/clash.yaml 是我根据 release 中的 example.yaml 手搓的,由于使用 Clash.Meta 内核, 配置文件中需要关闭 iptables 配置,如下:
iptables:
  enable: false
要十分注意的是,这种方案使用 N1 作旁路由时,其他被代理的设备,例如手机,笔记本,设置静态 IP 时,DNS 服务器的地址不能设置为 N1 的 IP!原因参见 tpclash README。
手搓 clash 配置文件 Link to heading
我们需要用到 mihomo 内核的两大特性:proxy-provider 与 rule-provider
具体使用方法参见 mihomo 的 官方 Wiki
配置文件的具体内容,见 Clash 配置文件。
mosdns 的安装与配置 Link to heading
DNS 服务默认使用 UDP 端口 53 来发送查询请求。
我的 mosdns 配置文件整体写的比较简单,只有根据域名列表分流的功能,即可以直连的域名,利用 mosdns 的 froward_cn 中设置的 DNS 进行解析;对其他域名,则将 DNS 请求转发给 tpclash。
对于可以直连的域名,如果不是 cdn 或者 ddns 域名,那么就先查询缓存,如果缓存命中,则直接从缓存中拿到结果,结束查询,否则再转发给 forward_cn 进行查询。
旧方案 Link to heading
该方案下,局域网内所有设备都会科学上网的情况。
采用 docker-compose 部署 mosdns,docker-compose.yml 内容如下:
version: '3'
services:
  mosdns:
    container_name: mosdns
    image: irinesistiana/mosdns:latest
    network_mode: "host"
    volumes:
      - /home/zwyyy/mosdns:/etc/mosdns
    restart: always
由于 docker-compose.yml 是将 /home/zwyyy/mosdns 目录映射到容器的 /etc/mosdns 目录,因此,我们将 mosdns 的配置文件 config.yaml 和域名列表等 txt 文件都存放在 /home/zwyyy/mosdns 目录下,mosdns 的配置文件内容如下:
log:
  level: info

plugins:
  # 缓存
  - tag: "cache"
    type: "cache"
    args:
      size: 10240
      lazy_cache_ttl: 86400

  # 转发给国内 DNS,并发查询
  - tag: "forward_cn"
    type: "forward"
    args:
      concurrent: 3
      upstreams:
        - { tag: alidns, addr: "tls://dns.alidns.com", dial_addr: "223.5.5.5", enable_pipeline: true }
        - { tag: dndpod, addr: "tls://1.12.12.12", enable_pipeline: true }
        - { tag: cfdns, addr: "tls://1.1.1.1", enable_pipeline: true }

  - tag: "forward_fake"
    type: "forward"
    args:
      upstreams:
        - { tag: fakedns, addr: "192.168.6.206:1053" }

 # 可以直连的国内域名列表
  - tag: "direct_domain"
    type: "domain_set"
    args:
      files: ["./apple-cn.txt", "./china-list.txt", "./direct-list.txt", "./tracker-domain.txt", "./direct-domain.txt"]

  - tag: "reject_domain"
    type: "domain_set"
    args:
      files: ["./reject-list.txt"]

  - tag: "cdn-ddns-domain"
    type: "domain_set"
    args:
      files: ["./cdn-ddns.txt"]

  - tag: "cn_seq"
    type: "sequence"
    args:
      - { matches: "!qname $cdn-ddns-domain", exec: $cache } # 如果非 cdn 或者 ddns 域名,则查询缓存
      - { matches: [has_resp], exec: accept } # 查找缓存,如果缓存命中,结束
      - { exec: $forward_cn } # 缓存不命中,通过设置的 dot 查询
      - { exec: query_summary }
      - { exec: accept } # 国内 DNS 查询完成,不再通过 Fake DNS 查询

  - tag: "proxy_seq"
    type: "sequence"
    args:
      - { exec: $forward_fake }
      - { exec: query_summary }

  - tag: "main_seq"
    type: "sequence"
    args:
      - { matches: qname $reject_domain, exec: reject 3 }
      - { matches: qname $direct_domain, exec: goto cn_seq } # 匹配到直连域名,则跳转到 cn_sequence
      - { exec: goto proxy_seq } # 没有匹配到直连域名,跳转 proxy_sequence

  - type: "udp_server"
    args: { entry: main_seq, listen: ":5533" }

  - type: "tcp_server"
    args: { entry: main_seq, listen: ":5533" }
新方案 Link to heading
该方案允许只让指定的设备具有科学上网能力。
采用 docker-compose 部署 mosdns,docker-compose.yml 内容如下:
version: '3'
services:
  mosdns:
    container_name: mosdns
    image: irinesistiana/mosdns:latest
    network_mode: "host"
    volumes:
      - /home/zwyyy/mosdns:/etc/mosdns
    restart: always
由于 docker-compose.yml 是将 /home/zwyyy/mosdns 目录映射到容器的 /etc/mosdns 目录,因此,我们将 mosdns 的配置文件 config.yaml 和域名列表等 txt 文件都存放在 /home/zwyyy/mosdns 目录下,mosdns 的配置文件内容如下:
log:
  level: info

plugins:
  # 缓存
  - tag: "cache"
    type: "cache"
    args:
      size: 10240
      lazy_cache_ttl: 86400

  # 转发给国内 DNS,并发查询
  - tag: "forward_cn"
    type: "forward"
    args:
      concurrent: 3
      upstreams:
        - { tag: alidns, addr: "tls://dns.alidns.com", dial_addr: "223.5.5.5", enable_pipeline: true }
        - { tag: dndpod, addr: "tls://1.12.12.12", enable_pipeline: true }
        - { tag: cfdns, addr: "tls://1.1.1.1", enable_pipeline: true }

  - tag: "forward_fake"
    type: "forward"
    args:
      upstreams:
        - { tag: fakedns, addr: "192.168.6.206:1053" }

 # 可以直连的国内域名列表
  - tag: "direct_domain"
    type: "domain_set"
    args:
      files: ["./apple-cn.txt", "./china-list.txt", "./direct-list.txt", "./tracker-domain.txt", "./direct-domain.txt"]

  - tag: "reject_domain"
    type: "domain_set"
    args:
      files: ["./reject-list.txt"]

  - tag: "cdn-ddns-domain"
    type: "domain_set"
    args:
      files: ["./cdn-ddns.txt"]

  - tag: "cn_seq"
    type: "sequence"
    args:
      - { matches: "!qname $cdn-ddns-domain", exec: $cache } # 如果非 cdn 或者 ddns 域名,则查询缓存
      - { matches: [has_resp], exec: accept } # 查找缓存,如果缓存命中,结束
      - { exec: $forward_cn } # 缓存不命中,通过设置的 dot 查询
      - { exec: query_summary }
      - { exec: accept } # 国内 DNS 查询完成,不再通过 Fake DNS 查询

  - tag: "proxy_seq"
    type: "sequence"
    args:
      - { exec: $forward_fake }
      - { exec: query_summary }

  - tag: "main_seq"
    type: "sequence"
    args:
      - { matches: qname $reject_domain, exec: reject 3 }
      - { matches: qname $direct_domain, exec: goto cn_seq } # 匹配到直连域名,则跳转到 cn_sequence
      - { exec: goto proxy_seq } # 没有匹配到直连域名,跳转 proxy_sequence

  - type: "udp_server"
    args: { entry: main_seq, listen: ":53" }

  - type: "tcp_server"
    args: { entry: main_seq, listen: ":53" }
实际上就是将 Mosdns 的监听端口修改为 DNS 服务默认使用的 53 端口。
配置 mosdns 时踩过的坑 Link to heading
-
设置
udp_server和tcp_server时,设置的 ip 和端口不能是127.0.0.1:5533,尽管官方 wiki 上是这么写的,但是127.0.0.1仅能用于本机的程序进行通讯,其他客户端的 DNS 请求转发到192.168.6.206:5533时,mosdns 监听的127.0.0.1:5533是不会有反应的。 -
在
main_seq中,要跳转到另外一条 sequence 上时,应该使用exec: goto cn_seq这样的形式,而不能直接用exec: $cn_seq,exec: $plugin仅适用于 plugin 为非 sequence 的情况。
主路由 的设置 Link to heading
旧方案 Link to heading
-
将所有的 DNS 请求转发给 mosdns:
-
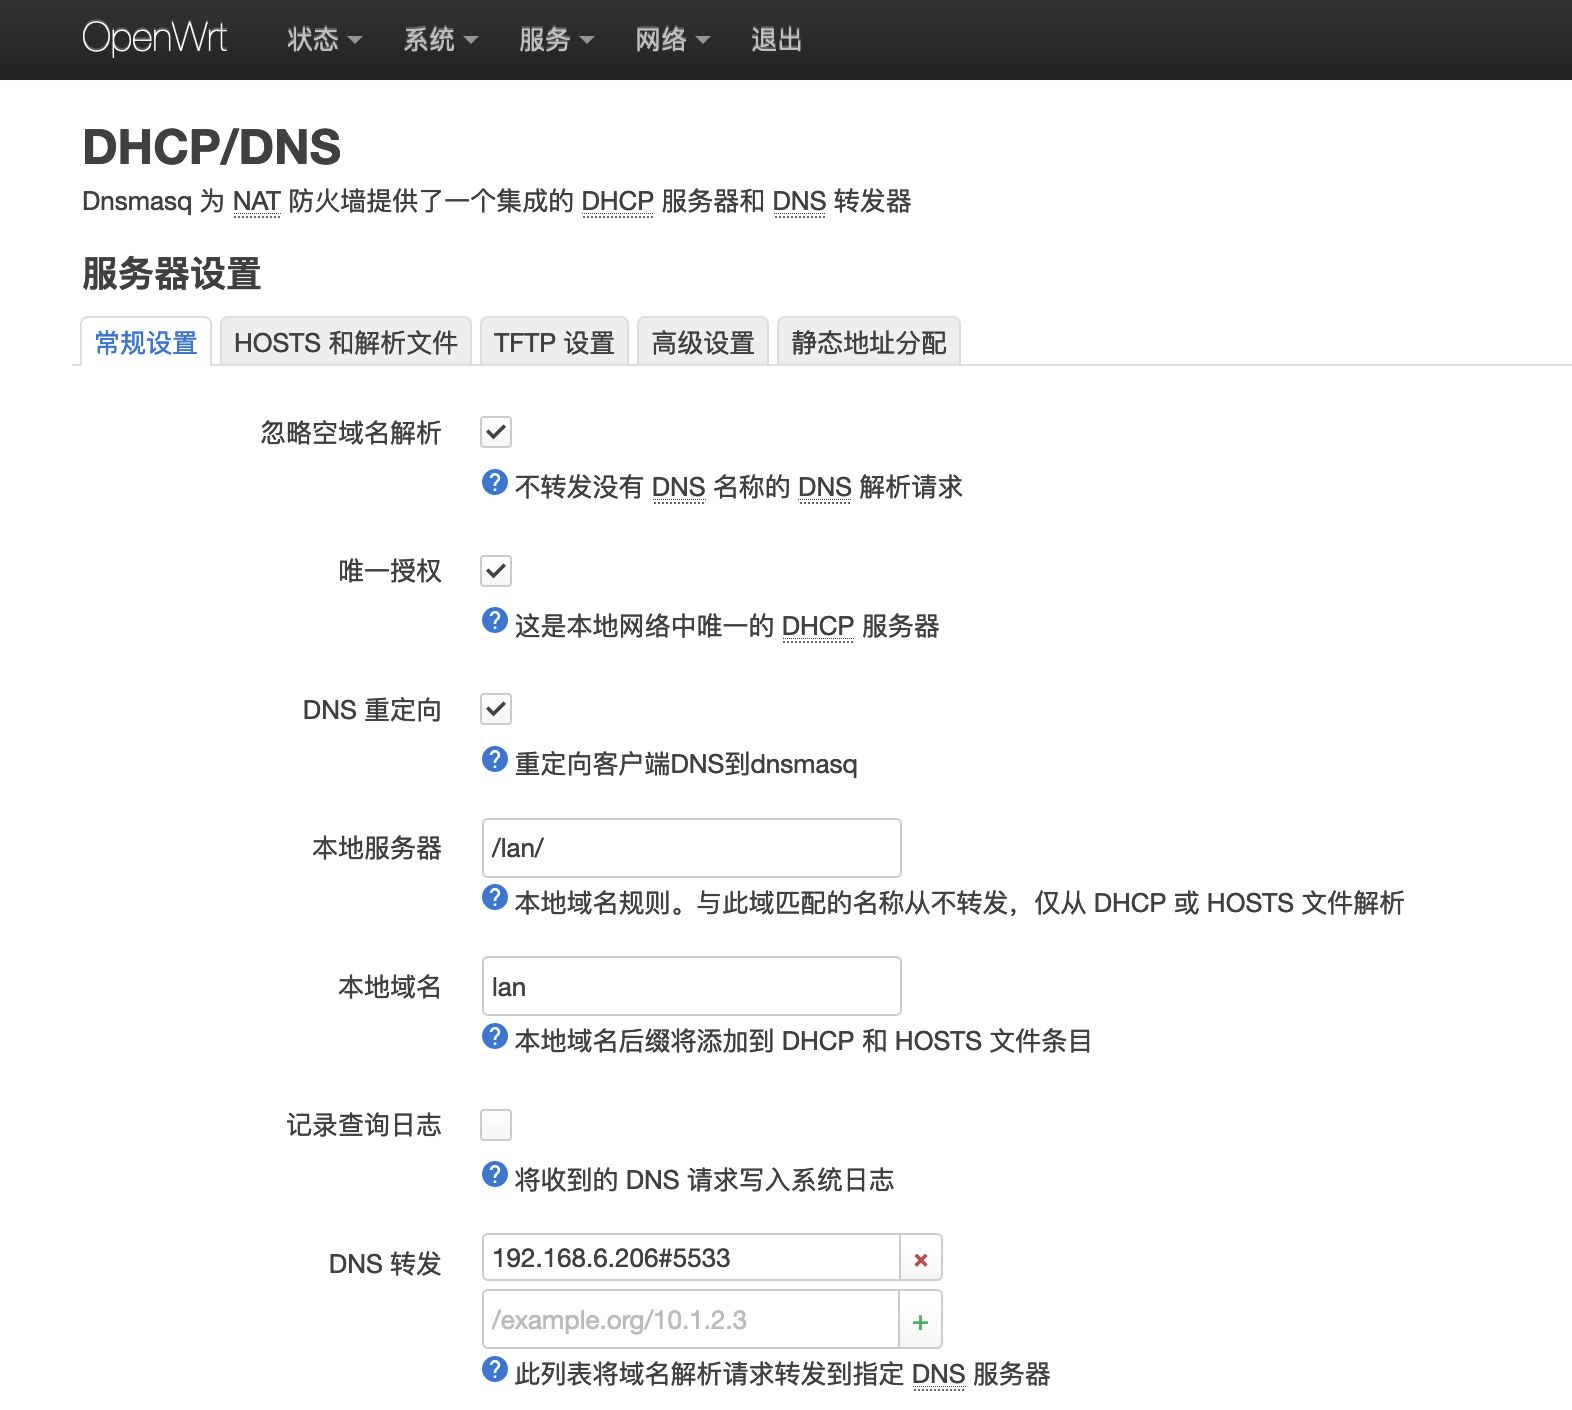
OpenWrt 下,点击
网络 -> DHCP/DNS,在DNS 转发那一栏添加192.168.6.206#5533,ip 与端口根据自己的实际情况而定。如下图所示: -
-
Pandavan 下,点击
-
-
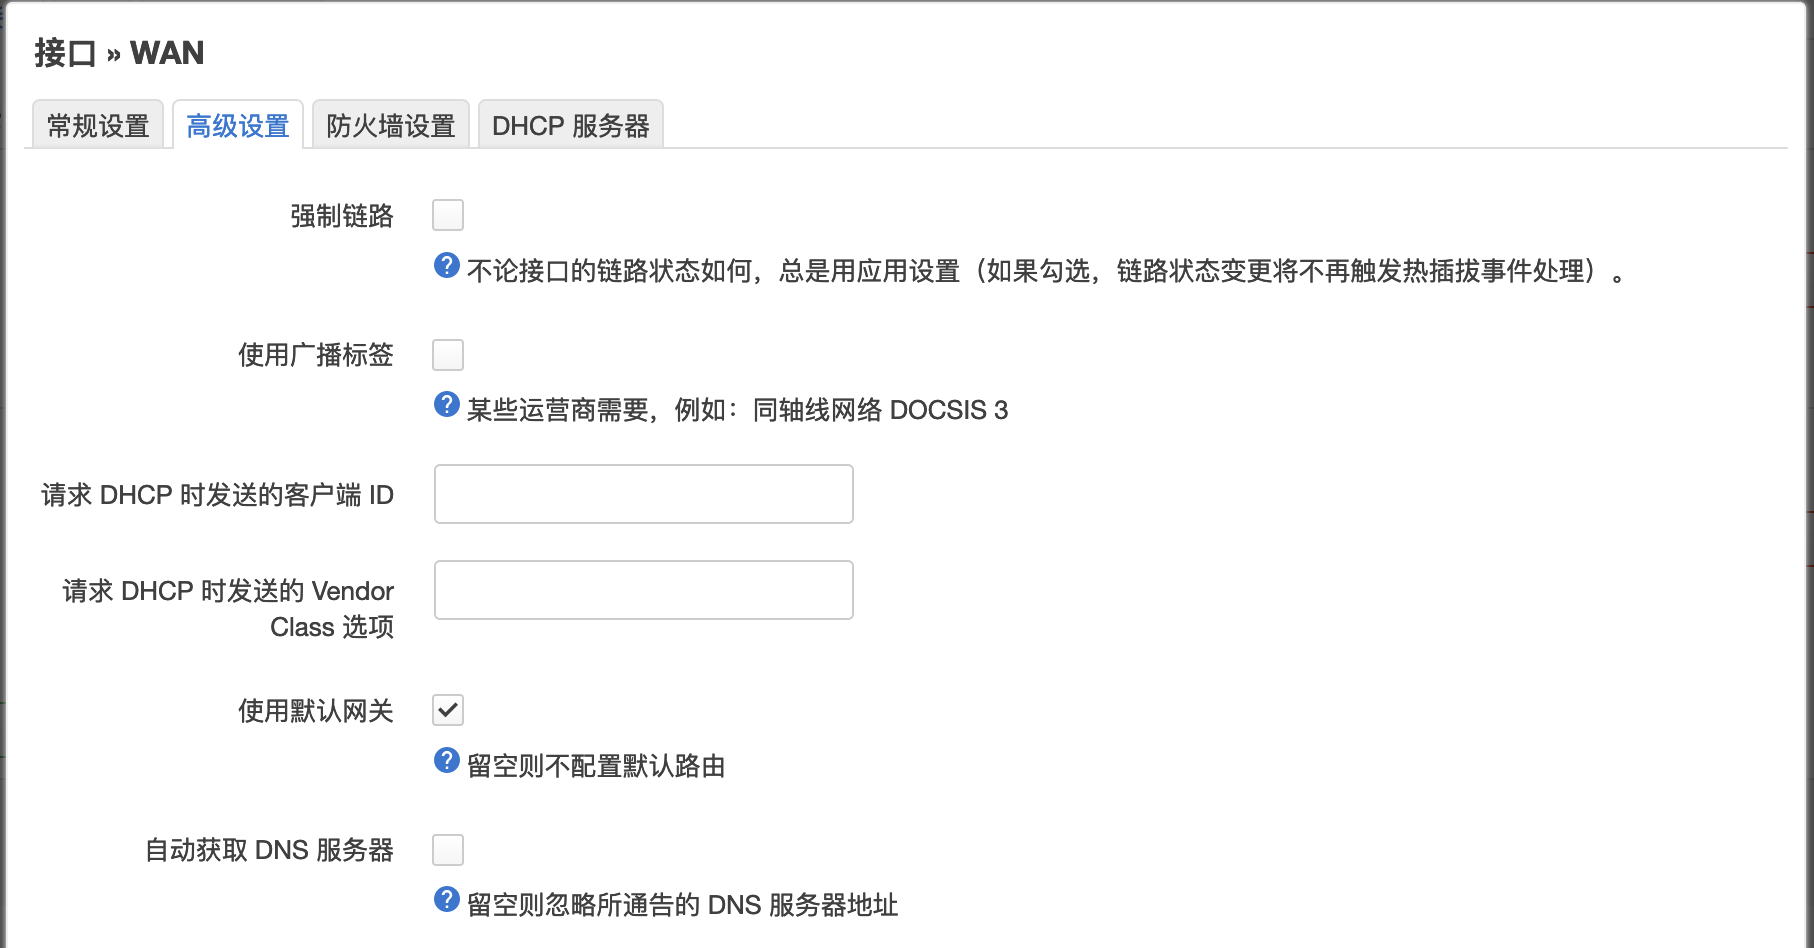
关闭接口 wan 的高级设置中的
自动获取 DNS 服务器选项!-
OpenWrt 下,点击
网络 -> 接口,点击 WAN 右侧的编辑,在高级设置中取消勾选自动获取 DNS 服务器,如下图所示: -
-
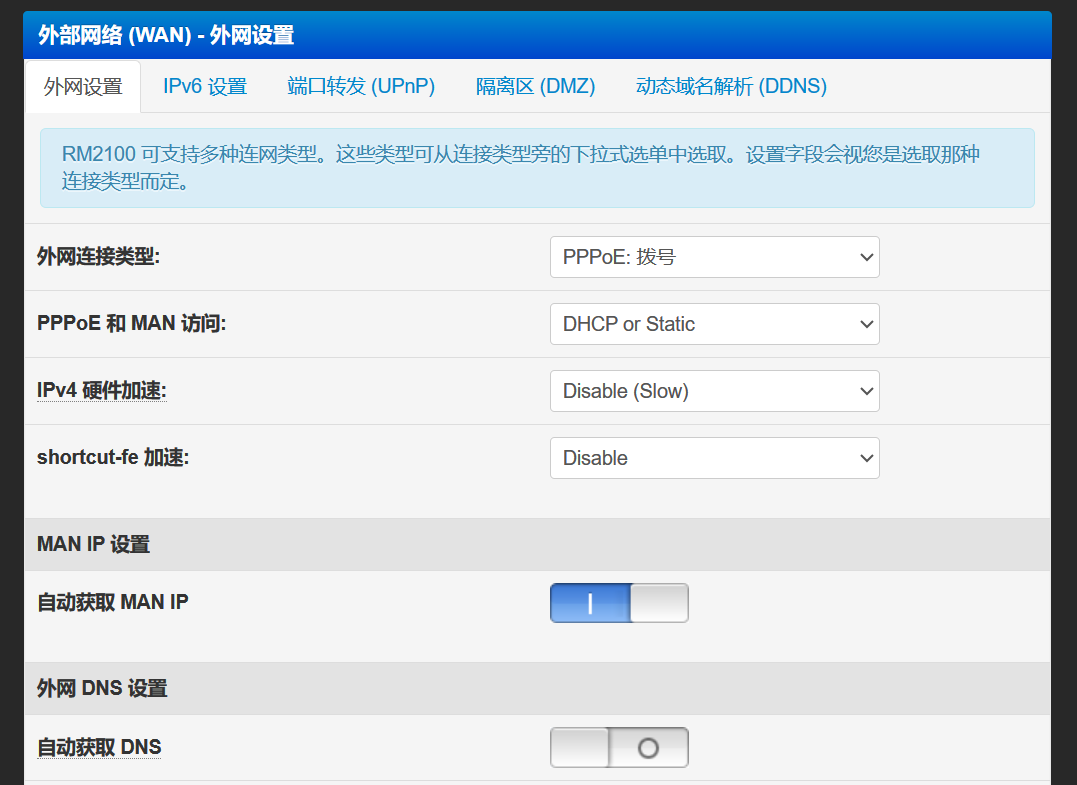
Pandavan 下,点击
外网设置,取消自动获取 DNS。如下图所示 -
-
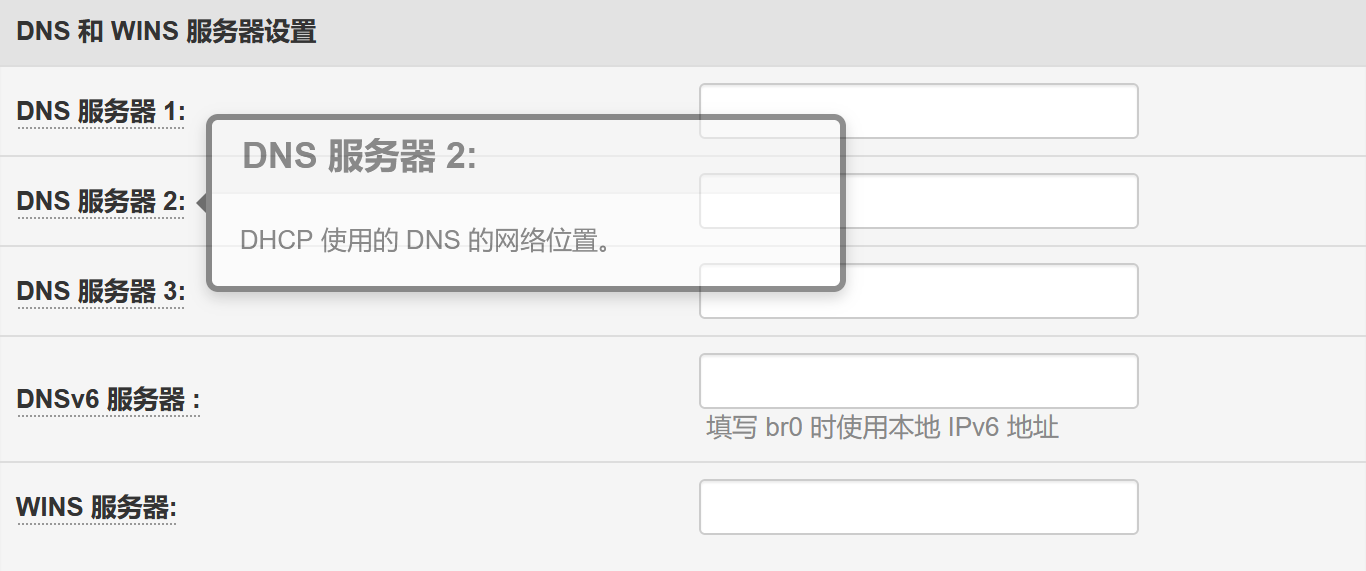
DNS 和 WINS 服务器设置留空
-
-
-
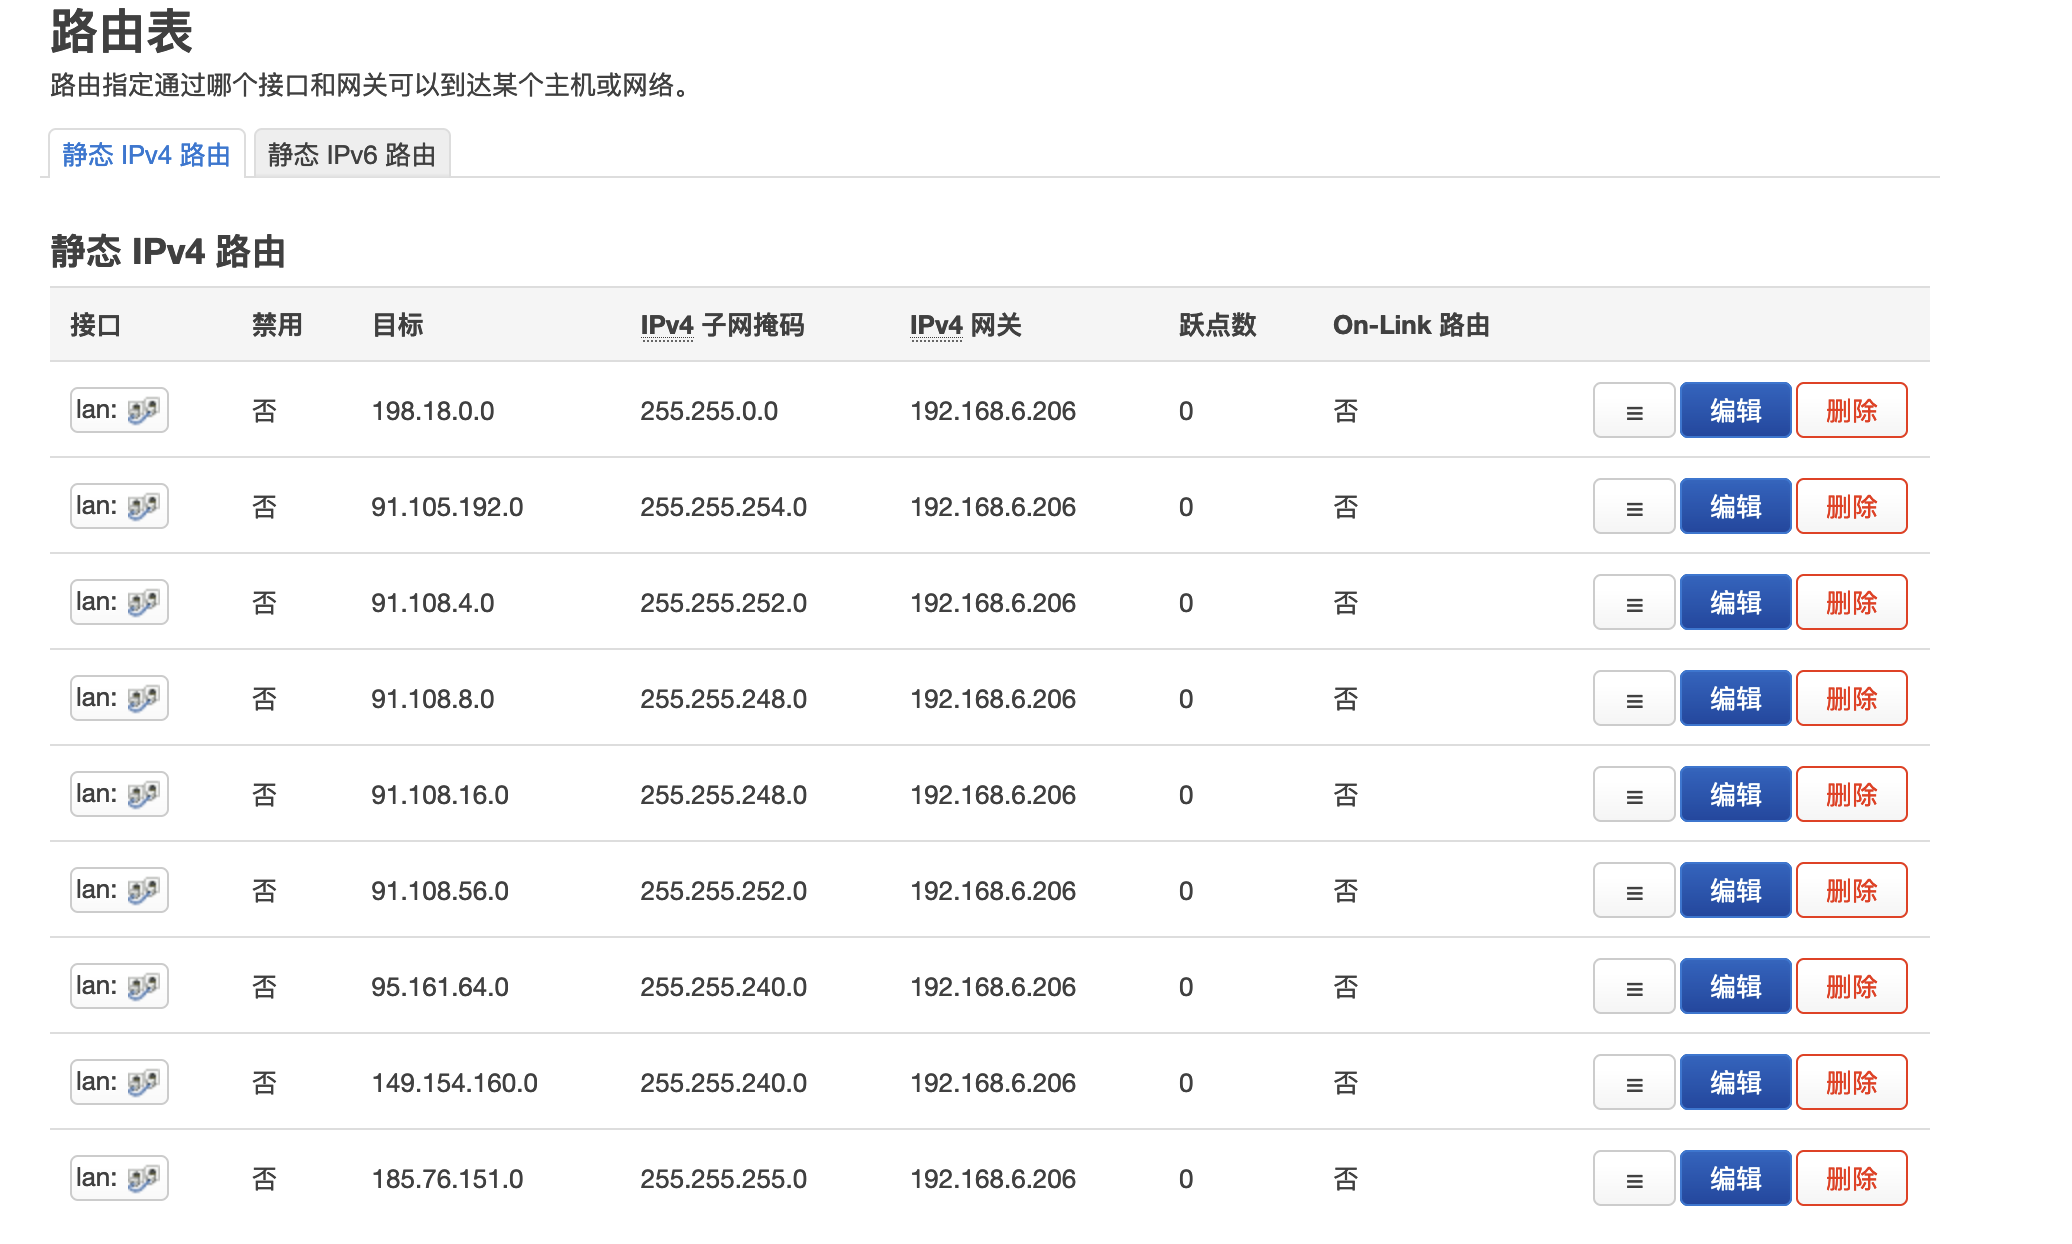
添加静态路由,如下图所示:
WAN 口的
自动获取 DNS 服务器选项如果不关闭,那么会导致域名解析时,DNS 请求没有被转发给 mosdns,而是被路由器从 WAN 口获取的 DNS 服务器解析了,从而客户端没有获取到 FakeIP,而是获取了可能被污染 RealIP。
目前只有 telegram 可能会通过 IP 直接连接,因此静态路由中要添加 telegram 的设置。
新方案 Link to heading
这里只演示 OpenWrt 主路由的设置。
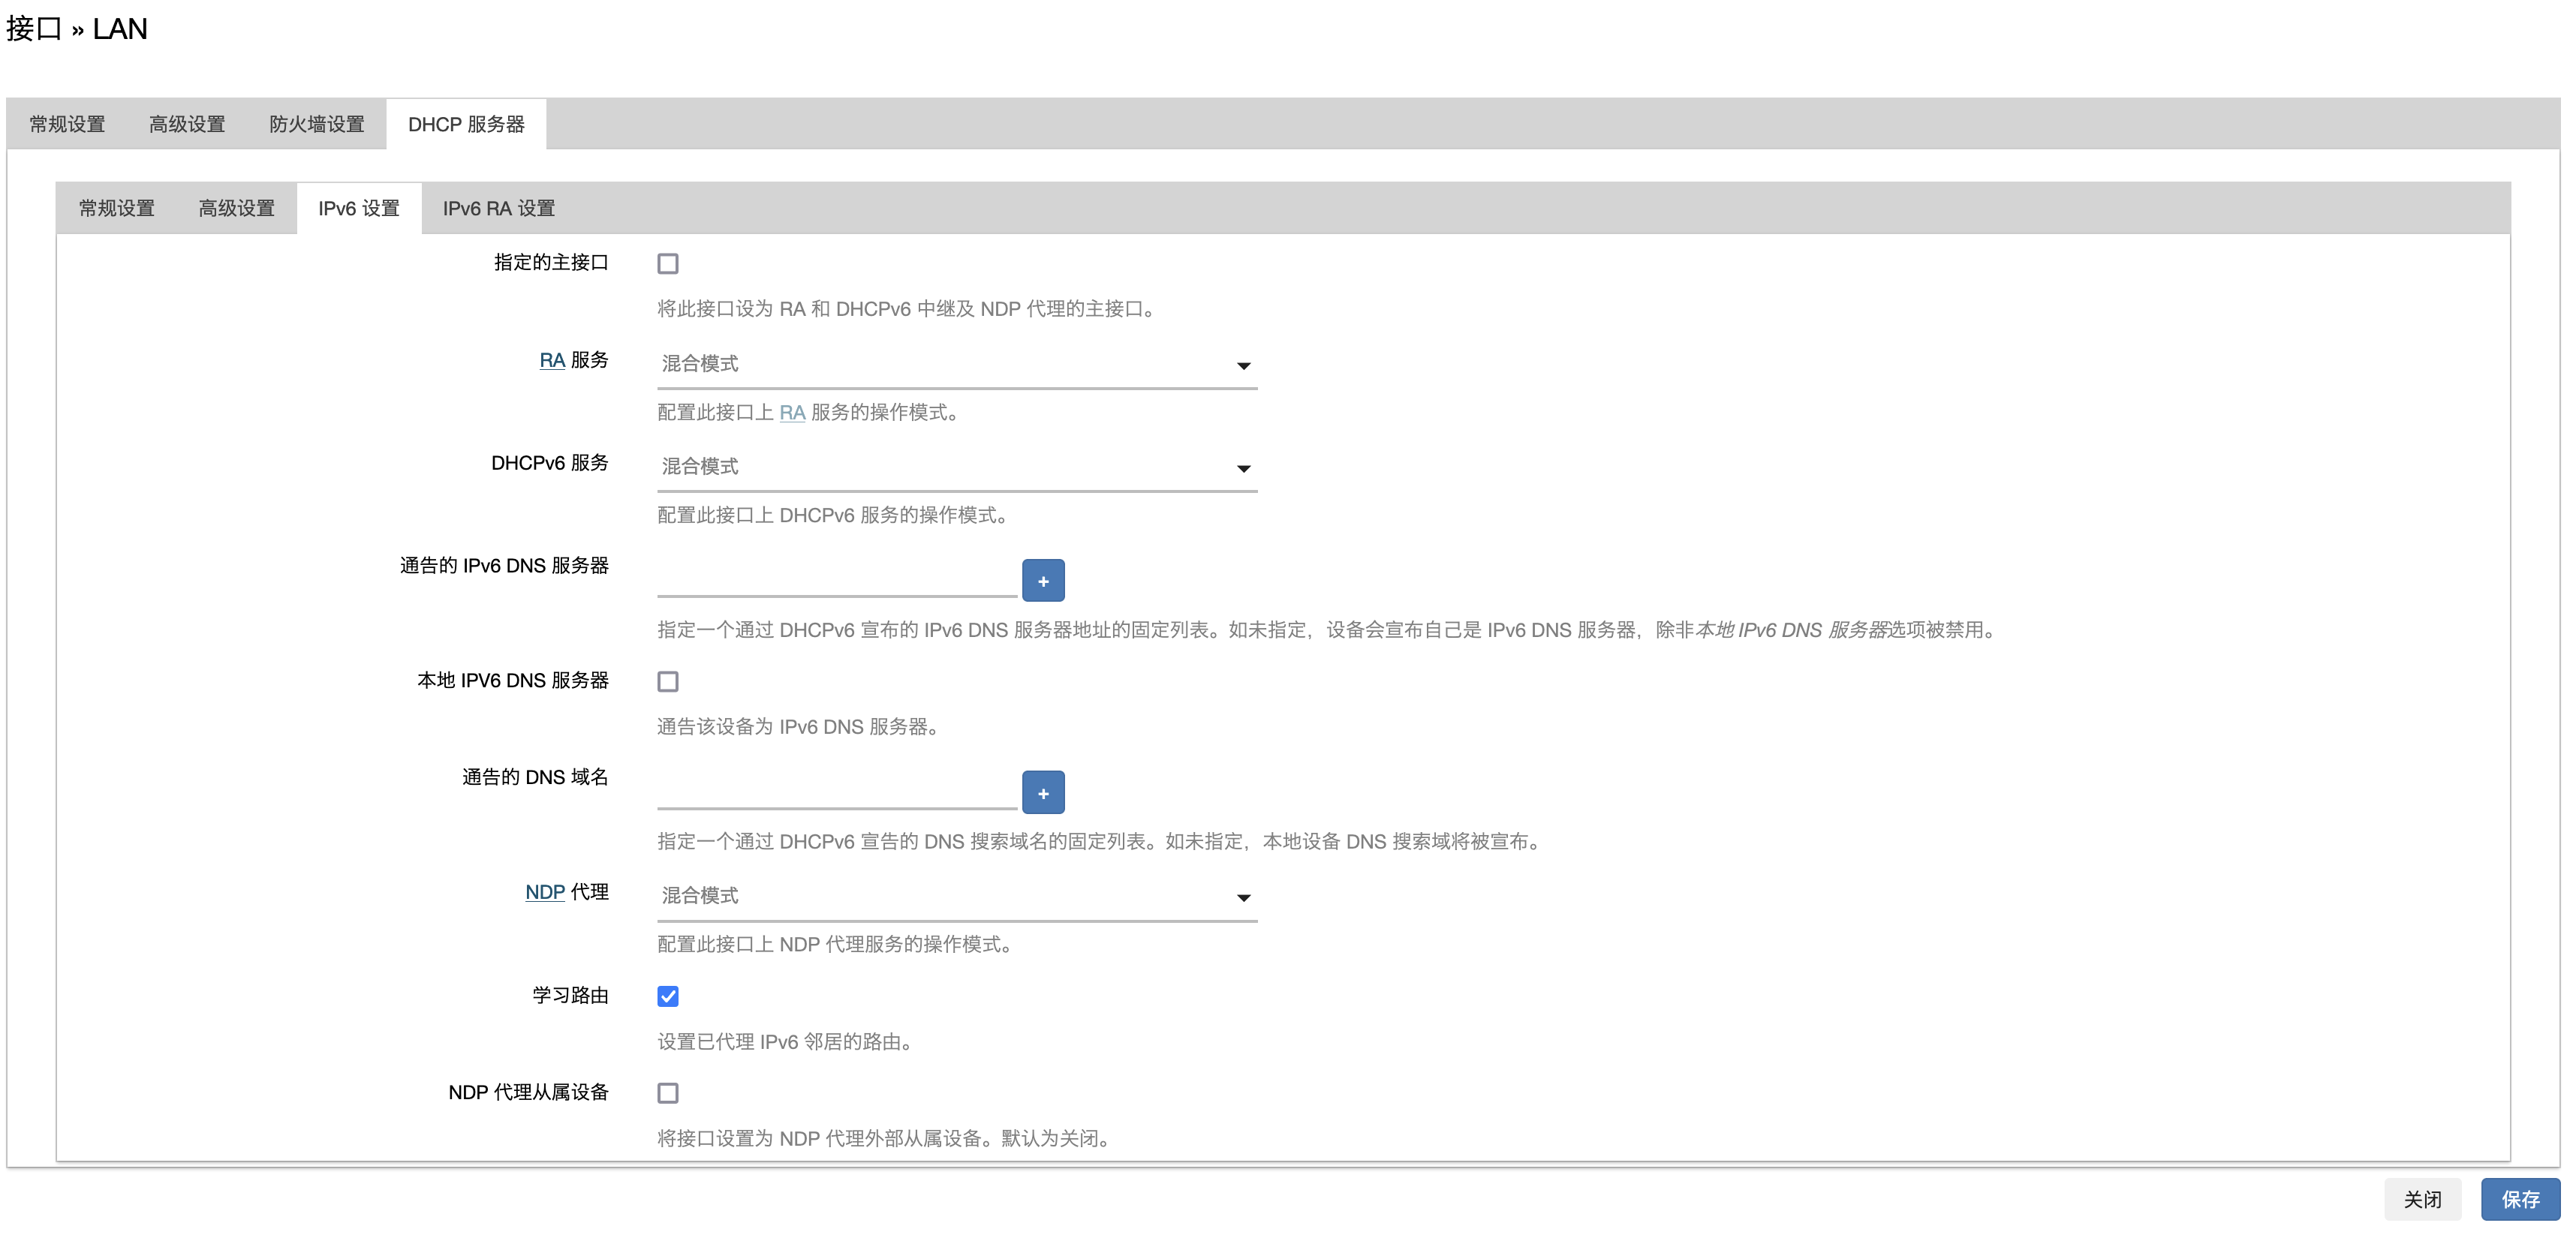
LAN 口中,DHCP 服务器 -> IPv6 设置,取消勾选 本地 IPv6 DNS 服务器,如下图所示:
添加静态路由的步骤与旧方案相同。
在 /etc/dnsmasq/conf 中追加如下内容:
## 为指定 IP 段的设备分配 gfw 标签
dhcp-range=set:gfw,192.168.6.152,192.168.6.182,255.255.255.0,24h

## 对具有 gfw 标签的设备,将其 dns 设置为 192.168.6.206
dhcp-option=tag:gfw,option:dns-server,192.168.6.206

## 设置路由器下设备的 dns 为 223.5.5.5,不会覆盖前面的设置
dhcp-option=option:dns-server,223.5.5.5
在 DHCP/DNS -> 静态地址分配 中,为你需要科学上网的设备分配 192.168.6.152 至 192.168.6.182 之间的 IP,然后执行 service restart dnsmasq 即可。
mosdns 与 tpclash 的配置文件更新流程 Link to heading
通过 crontab 定时执行 /home/zwyyy/mosdns/update.sh 来更新 mosdns 配置文件所需的域名列表 txt 文件。
N1 的 /home/zwyyy/mosdns/update.sh 的文件内容如下:
#!/bin/zsh

# 设置 GitHub 仓库的所有者和仓库名
GITHUB_OWNER="Loyalsoldier"  # 替换为仓库所有者的用户名
GITHUB_REPO="v2ray-rules-dat"    # 替换为仓库名称

# 要下载的文件列表
FILES=("apple-cn.txt" "china-list.txt" "direct-list.txt" "direct-tld-list.txt")

# 构建 API 请求 URL
API_URL="https://api.github.com/repos/$GITHUB_OWNER/$GITHUB_REPO/releases/latest"

# 获取最新 release 的所有资产信息
ASSETS=$(curl -s $API_URL | jq -r '.assets[] | {name, browser_download_url}')

# 下载每个文件
for FILE_NAME in "${FILES[@]}"; do
    DOWNLOAD_URL=$(echo "$ASSETS" | jq -r --arg FILE_NAME "$FILE_NAME" 'select(.name == $FILE_NAME).browser_download_url')

    # 检查下载链接是否为空
    if [ -z "$DOWNLOAD_URL" ]; then
        echo "未找到文件 $FILE_NAME"
        continue
    fi

    # 下载文件
    echo "正在下载 $FILE_NAME..."
    curl -L $DOWNLOAD_URL -o $FILE_NAME
done

curl -L "https://raw.githubusercontent.com/zwyyy456/dotfile/main/myproxy-rule/mosdns/domain-set/proxy-domain.txt" -o proxy-domain.txt
curl -L "https://raw.githubusercontent.com/zwyyy456/dotfile/main/myproxy-rule/mosdns/domain-set/direct-domain.txt" -o direct-domain.txt
curl -L "https://raw.githubusercontent.com/zwyyy456/dotfile/main/myproxy-rule/mosdns/domain-set/cdn-ddns.txt" -o cdn-ddns.txt
curl -L "https://raw.githubusercontent.com/zwyyy456/dotfile/main/myproxy-rule/mosdns/config.yaml" -o config.yaml

echo "所有文件下载完成。"

docker restart mosdns
arm-tao.yaml 本身是通过 gist 来管理的。
而在 arm-tao.yaml 中,rule-provider 的自定义 rule-set 中的源文件是直接存在 github 的公开 repo 中,链接即 repo 中的源文件的直链。
定时更新 tpclash 的配置文件的脚本如下所示:
cd /data/clash
rm arm-tao.yaml
wget "https://gist.githubusercontent.com/zwyyy456/<token>/raw/arm-yuan.yaml" -O myconfig.yaml
systemctl restart tpclash
systemctl status tpclash
解决 google play 可以搜索,但是无法下载的问题 Link to heading
关键在于 services.googleapis.cn 这个网址,被 RULE-SET,direct,DIRECT 匹配到了,因此走了直连。解决方案很简单,在 mproxy.yaml 中追加 - DOMAIN-SUFFIX,services.googleapis.cn,使得该域名走代理,追加后内容如下:
同时 mosdns 所用的 proxy-domain.txt 追加 services.googleapis.cn,防止 services.google.cn 直接被 mosdns 设置的本地 DNS 解析,而不是被 Fake DNS 解析,追加之后内容如下:
bing.com
services.googleapis.cn
google.cn
关于 New Bing Link to heading
很奇怪,尽管已经保证 bing.com 以及它的子域名一定会走代理,但是还是需要登录之后才能使用 New Bing,否则提问时会提示无法连接。此外,建议 Windows 与 Mac 都关闭 edge 的获取定位权限,同时 Microsoft 帐号将位置设置于美国。
题外话 Link to heading
浏览器的缓存会导致通过直链下载配置文件时,尽管 gist 或者 github 的 repo 中已经修改了,但是下载下来的文件还是没有变化。